The Guide to Choosing Rock Sliders and Rocker Guards

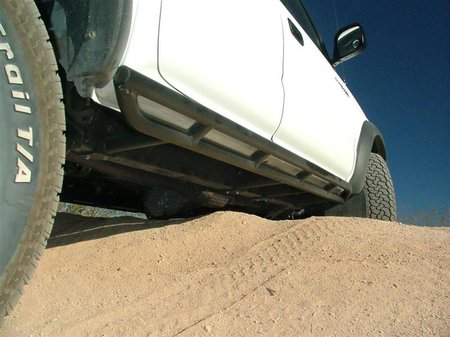
If you're going to be on rocks or in ruts you need rocks sliders. They protect your rocker panels from rocks and stumps, make a handy pivot point when you need to get around or over an obstacle, and give you a convenient spot to step when you’re maneuvering around your 4x4. Use this guide to build or buy the best 4x4 rock sliders.
As with everything we add to our 4x4s, rocker guards and sliders are a great compromise between durability, weight, cost, and fit on a particular rig. There are some basic criteria you should look at before building or buying a set of sliders. Even bolt-on options are not perfect for everyone, but issues can often be fixed with a welder and a grinder. As you're reading, think about how you use your 4x4, the type of terrain you wheel, how often you get stuck, and how you get unstuck.
We'll take a look at materials and construction methods of rock sliders and rocker guards below.
The Difference Between Rock Sliders and Nerf Bars
These nerf bars bolt to the body of your truck. They look good and install quickly, but won't take the weight of your truck repeatedly like a frame-mounted rock slider will.
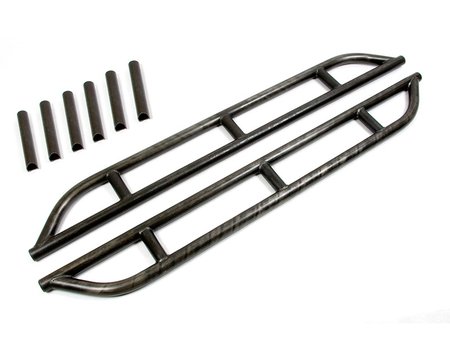
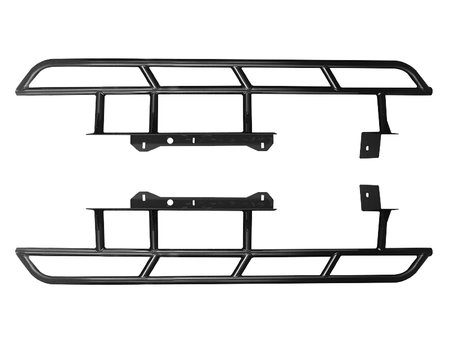
This slider can take the weight of your rig and even be used to flip you back after a rollover. It comes in a bare metal finish and needs to be welded to the frame. It's made with 1 3/4" DOM tubing and comes with the stringers unwelded so that you can place them where necessary.
Rock sliders and nerf bars are totally different and serve different purposes. Nerf bars exist to look good, prevent people from opening their car door into your truck, and maybe be used as a step. They are made out of thinner, lower-grade materials than rock sliders as they aren't expected to support your rig's weight. They usually bolt on in under an hour to the body of your 4x4 in existing holes. Since they bolt to the body, you can't expect them to repeatedly take hits without eventually messing up your rig's body somehow. Nerf bars are typically half the price of rock sliders, which reflects the fact that they use lower quality materials and are mass-produced.
These bolt to the frame after you drill mounting holes. The square and round tube structure will take any punishment you can throw at it.
Rock sliders are completely different. They need to take the weight of your rig so they are made of thick materials of a decent manufacturing grade. Any reputable rock slider manufacturer will know whether their sliders are HREW or DOM, and what the dimensions of the materials are. They are often made to order to fit your needs. You may prefer weld-on DOM sliders with a kickout or bolt-on HREW straight sliders. Sometimes with some of the smaller shops you'll need to wait for them to build your sliders as they are not mass-produced and won't always be on the shelf. Installation of rock sliders usually takes longer. You'll need to drill holes in the frame and/or body and some slider kits need to be welded on. Because of the stronger and more durable materials, and the more exacting construction methods, they are usually more expensive than nerf bars.
Do You Need Rock Sliders?
Some guys seemingly roll their rig every weekend, but others just want to cruise down the trail to look at cave paintings and mountain views. There is a huge range of driving styles and abilities, and different levels of acceptance of body damage. Assuming you don't want to just look cool, sliders serve a few uses on the trail besides just protecting your 4x4's body:
- Body protection - This is the first reason most people get some guards. It's easy to have encounters with rocks and logs that come close to denting or ripping a hole in your rig.
- Kickout - Some sliders come with a kicker, a little bump at the back of the slider) that pushes your rig over and away from an obstacle. This protects your body and keeps your rear tire out of the obstacle.
- Pivot point - You can do some fancy driving and pivot around obstacles using the slider. This is a good technique for tight turns.
- Recovery/stabilizer point - Well-built sliders are adequate attachment points for flipping you back on your tires after a rollover.
- Step - Sometimes you have to stop in deep mud or puddles and get out of your 4x4. Sliders that are wide enough can let you shimmy along your rig or provide a jumping-off point for getting to solid ground.
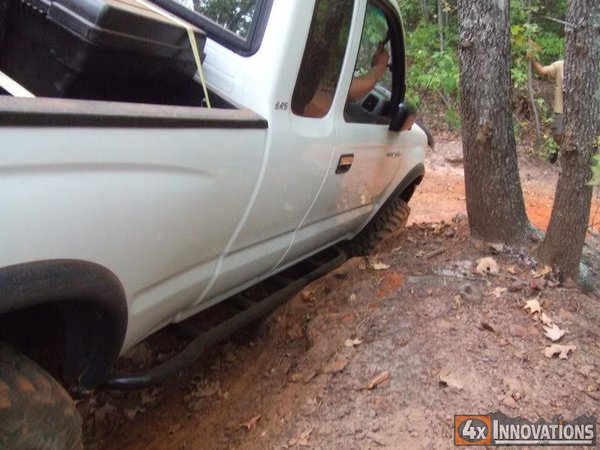
This is why you need rock sliders! A few trips like this would destroy nerf bars.
Rock Slider Materials
Best Slider Materials for Hard Use
- 1020 DOM Steel
- 1020 HREW Steel
DOM and HREW Steel
Most rock sliders and rocker guards these days are built with HREW or DOM steel tubing. The grade is usually SAE 1020 mild carbon steel and both are stronger and more gouge and dent resistant than aluminum. “HREW” and “DOM” both refer to processes. For instance, in product specifications you’ll see “made from 1020 DOM”, which tells you about the material process (DOM) and the material properties (1020).
HREW (Hot Rolled Electric Resistance Welded) tube is economical steel
tubing. It’s used in lots of fabricated 4x4 parts, although although we prefer not to use it in roll cages.
DOM (Drawn Over Mandrel) is stronger but also more expensive than HREW.
Essentially it’s HREW that is cold-worked by being
drawn through a die and over a mandrel. This process removes the mill
scale (making it smoother), forces the tube to have consistent and
precise dimensions, and improves the molecular structure of the steel. DOM is the process of manufacture we prefer for the material a roll cage.
While choosing between HREW and DOM for a roll cage can be a big deal and is always a subject of debate on the Internet, it’s not as important for sliders. Neither will fall apart on the trail, though DOM tubing may be more resistant to denting from a lot of abuse.
Some manufacturers allow you to highly customize your sliders. These sliders from 4xInnovations come in HREW, DOM, with a kickout, and without a kickout.
Aluminum
Most sliders are made from steel because it’s strong, widely
available, relatively cheap, and makes good sliders. Aluminum sliders
are lighter - but that’s probably the only benefit. Aluminum requires
different welding processes than steel and more skill to weld (the
bottle of C25 you use for MIG welding won’t work for aluminum). Plus,
aluminum is more expensive than steel.
Aluminum is also softer than steel, so it’ll gouge if you’re sliding your truck over hard obstacles like rocks. Aluminum is weaker than steel, so you generally need to upsize it to have the strength of a dimensionally smaller steel 4x4 part. There are alloys of aluminum that are strong, but they generally still do not have the durability of steel, and definitely not at the same price point. A person determined to have aluminum sliders could skin the sliders with UHMW (as is often done with aluminum skid plates), but that’s a lot of work.
If you don’t expect to do a lot of rock dragging and you’re okay with the added expense, aluminum is fine, but a typical 4x4 that requires a high level of function and durability should stick with steel.
Material Dimensions for Rock Sliders
The Best Material Dimensions for Most 4x4s
- Round tube: 1.5-2" diameter, 0.120" wall
- Square tube: 1.5-2" per side, 1/8"-3/16" wall
- Panels: 3/16" thick
Material thickness
Most manufacturers have settled on certain thicknesses for rock sliders and rocker guards. Sliders have to do mostly three things:
- Resist bending
- Resist denting
- Resist splitting at the tube weld seam
Thicker materials will resist bending and denting more easily than thinner materials. Pretty easy right?
Round tubing is usually 0.120” thick. Why? 0.120” wall is pretty much an industry standard - it’s relatively inexpensive, light, and easy to bend. Lots of shops got their start in a home garage with a hand operated bender and 1.5” or 2” OD - 0.120” wall round tube bends easily in a manual bender. This seems to do the job for most wheelers and if .120 wall was a problem we'd expect to see a lot more manufacturers using thicker tube.
For square tube, 1/8”-3/16” is the norm, with the occasional truck sporting 1/4” sliders. We tend to prefer thinner materials to save on weight, so we’d stick with 1/8” or 3/16”. Pick one based on your wheeling style - if you’ll spend lots of time on your sliders or you have a heavy 4x4 (like a fullsize pickup), go with the 3/16”.
One last thing to keep in mind with tube size: A 2”x0.120” round tube will be weaker in bending than a 2”x2”x0.120” square tube of the same length. This would seem to indicate that wherever you can use a 2”x0.120” round tube that must resist bending forces, you could use a 2”x2”x0.120” square tube. In practice, many people still go to 3/16” or even 1/4” when using square tube. We wonder if this is for practical reasons or if this is just because of the natural tendency of many of us to overbuild.
Panel or boatside-type sliders that cover rocker panels should be 3/16” thick. This indicates that they’re well-built and they’ll usually be braced along the length with a piece of tubing. If they aren’t braced, they probably won’t last long on a 4x4 and don’t count on a panel less than 3/16” thick standing up to repeated abuse.
Boat side sliders create a flat, angled area from the body to the frame. These also have two holes integrated so that you can fit a Hi Lift Jack.
Material diameter
Round tube diameter is usually 1.5”, 1.75", or 2” OD. 2" is the strongest, but you'll be fine with whatever size fits in the die you have!
Square tubing in sliders is usually a minimum of 1.5”x1.5” up to 2”x2”. 2”x3” or 2”x4” rectangular tubing is super strong and creates a wider step, but adds quite a bit of weight. Read below about square tube vs. round tube!
Rock Slider Finishes
Best finish for hard use
- Bare metal with spray paint
Several different coatings are available for rock sliders, but if you wheel your truck hard, coatings won’t matter. There is no coating that will stand up to repeated abuse on rocks.
There are three finishes you can get from manufacturers. They are:
Bare metal - This is cheaper than a finished slider. Since you’re going to prep, prime, and coat the sliders you can do whatever you want to them, including painting them pink and stenciling on the outline of a Colt M1911.
Painted - Usually black, sometimes other basic colors.
Powdercoated - This is the next level of swank. While it is a beautiful,
hard coating, it will chip if kissed by enough rocks. Most normal
people don’t have the equipment to do powdercoating and most fab shops
farm this out anyway. It’s only worth the extra expense if you won’t be
seriously scraping your sliders. Powdercoating is better for 4x4 campers and
mudders. Powdercoated sliders cost significantly more than bare metal.
Many sliders come only in a bare metal finish. Take note of a few design elements: The bolt-on frame bracket is one piece and will stiffen the stock Tacoma frame quite a bit. There is a kickout and the stringers are square tube, which is stronger than round.
DIY finishes
If you're building rock sliders or buying them bare metal, we have two suggestions on finish.
Paint - This is the finish you want if you bang up your sliders a lot. This is easy, inexpensive, a piece of cake to maintain,
and won’t make you cry like when you chip powdercoat. Some people use the $1 paint in some stores, but we've found it to be even crappier than our trucks are used to.
Hard bedliner - A hard bedliner coating (like Herculiner or POR15) gives you a wide selection of c olors and you can apply these coatings yourself. These coatings will not stand up to prolonged rock drags or tight rock slider pivots. This means that, like the spraycan method, you’ll still have to do touchup if you’re rockcrawling. If you do more casual backcountry exploring or you spend a lot of time in the mud, either of these coatings will be fine and will hold up much better over the long term than spraypaint.
Evaluate your coating options before buying and make sure the rock slider coating you get matches your use! If you plan to do lots of trails and will be rubbing your rockers all over the place, buy some bare metal sliders and some spray paint.
Weld-on or Bolt-on Sliders?
Best attachment methods
- Weld or bolt to the frame for hard wheeling
- Bolt to the body for light protection, though it may hurt resale
- Weld to the body for custom strength
Rock sliders need to be mounted securely to your 4x4. When you’re fourwheeling, you’ll probably need them to support the weight of your vehicle and you may need to use them as a winch point if you flip. Since sliders stick out from your truck a little bit, they give you a convenient spot to attach a winch line. This also gives you added leverage from the slider being so far away from the center line of the truck. But should you weld-on or bolt-on? This is a big factor for most people, since, if you don’t have a welder, you’ll have to either pay someone to do the job or use bolt-ons. But it isn’t just as simple as whether you have a welder or not.
Bolt-on Rock Sliders
With bolt-ons, you’ll often need to drill your frame or body. Once you’ve drilled your body/frame, there’s no going back!!! There are a few companies out there that make fully bolt-on, no-drill rock sliders for some 4x4s, but not a ton. Just think what that requires: There need to be enough existing bolt holes in your frame in the right locations that have enough space to allow you to bolt on sliders. This results in some slight compromises, but it's a good option if you change trucks as frequently as underwear. Here are some other things to think about with mounting:
Drilling the body of your rig
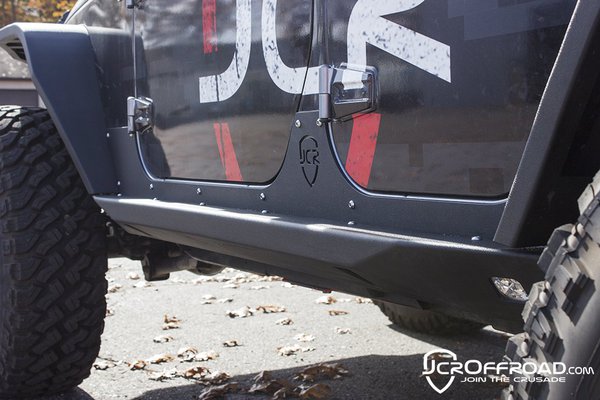
These sliders bolt to the body, but not the frame. This maximizes clearance but still isn't quite as strong as a frame-mounted slider. That said, these sliders should be incredibly strong since they come so high on the body, have tube reinforcement, have 18 mount bolts, and are made from 3/16" steel.
If you drill holes in
your rocker panels you’re introducing a point for water entry which
will cause rust in the sheetmetal. 4x4 bodies are made of steel, so unless you have an aftermarket aluminum tub, you'll always be worrying about rust.
After drilling the body, you can prep and paint the hole edges, but you need to do it right so that the paint adheres properly. Carefully read the directions on your can of paint - if your rocker guards sit directly against the body like with many Jeeps, you'll probably need to let the body paint cure for up to a week before bolting up the guards.
After that, you should consider pulling off the rockers once every 1-2 years to make sure you’re not collecting dirt between the rocker and slider and to check the holes that you drilled in the body.
On unibody vehicles like this Jeep WJ (and lots of modern SUVs) you can bolt sliders directly to the body and the main "frame" tube. On a unibody this is possible because the body and "frame" are one integral piece.
By drilling the body you may also affect the resale value and future mod potential of your rig. If you decide to switch out your rocker guards in the future - well, you might end up with some unsightly holes in your rocker panels. If your rocker guards are on long enough (years) you might have paint fade on the rest of your body, but not under the rocker guards since the rocker panel will have been protected from the sun. Prospective buyers of your truck might not be as fond of your rockers as you are and your truck will have holes in the body if they pull the guards off.
Drilling the frame of your rig
Drilling the frame is not as as bad as drilling the body as long as you aren’t making the frame into swiss cheese. However, the same issues with rust still apply. You’ll need to prep and paint the holes and make sure that the paint is holding up over time. Water can seep into the holes you make and between the slider bracket and the frame. Your frame channel will need to be able to drain and dry out after getting wet. This is easy for a c-channel frame, but a full tube or boxed frame will hold in moisture without regularly being blown out or having clear drain holes.
In terms of strength, bolt-on sliders are just as strong as weld-on sliders as long as the hardware is properly sized and graded for your truck (not a problem with any reputable manufacturer).
Weld-on Rock Sliders
This mostly pertains to those of us that already have welders and happen to do a lot of DIY on our 4x4s. If you read the above and decided that bolt-on sliders aren't for you, read on. You should be able to weld on most bolt-on sliders.
Welding to the Body
When we talk about weld-on rocker protection, we’re almost always
talking about welding on to the frame. Welding to the body is almost
always custom. Usually it’s because the rockers have been chopped or
trimmed due to rust. On some 4x4s we see the entire rocker panel cut out, a few inches of floor cut out, and and a 2" x 4" piece of tubing welded in its place. (In fact we had this setup on an FJ55 Land Cruiser.
Rocker guards that are integrated and welded to the body generally shouldn't be directly
welded or bolted to the frame on ladder frame vehicles. On a traditional
ladder-style frame the frame and body are isolated from each other by the body mounts that dampen vibration and allow the body and frame to flex somewhat independently of one another.
If you want to connect your body-welded rockers to your frame you should use poly bushings between the body and frame to maintain some isolation between the two.
If you have a unibody vehicle like a Jeep Cherokee, you can go hogwild - since the body and frame are one piece you can weld wherever you want.
Welding to the Frame
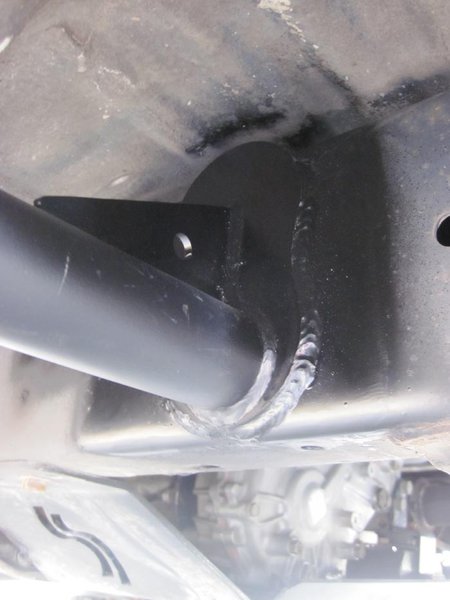
Frames are too thin to weld your sliders directly to them. You need to add a thicker plate that can take heavy force and distribute it in a wider pattern. Some sliders come with weld-on frame plates and some don't.
Like we said above, welding and bolting to the frame are functionally
equivalent. To use the sliders as actual sliders, where you’ll be sliding off
ledges and rocks or pivoting your 4x4 around obstacles, they need to be
solidly welded to the frame. The steel of most 4x4 frames isn’t more
than 1/8” to 3/16” thick which isn't enough to support the full weight of your rig on a regular basis.
Luckily for you, slider kits come with frame plates that are usually 1/4" thick. They effectively make your frame thicker and spread the load out. If you're DIYing your sliders, you should also use some frame plates that will keep your sliders from trying to punch a hole in your frame.
Slider Design
If you just want rock sliders for looks and the occasional hard use, you’ll probably have different requirements from someone that expects to constantly be hard on their sliders. Important design considerations include:
Length
A rock slider needs to provide exactly the amount of rocker protection that you need. For most people this means that they’ll be the full length of the rocker. This shouldn’t be too hard for you to figure out when you’re buying as you’ll hopefully know if you have an extended body 4x4, like an extra cab truck. Since different manufactures make different sliders, make sure to check out side shots of the sliders you plan to buy so that you know they provide the coverage that you want.
Square or Round Tube
Demello Offroad calls these "light-duty" because of the round main tube that runs directly under the rocker panel.
Manufacturers making seriously heady duty rock sliders use square main tubes and square or round secondary tubes. The main tube is most likely to take the weight of the 4x4 and needs to resist bending - square is better at this than round.
Square tube resists bending forces better than round tube. Round tube resists torsional forces better than square tube. In the context of sliders, this probably doesn’t matter too much since most sliders made by smaller manufacturers are built with tested and proven material sizes. But if you’re ever wondering why round tube is so much more common as a fab material than square tube, given it’s strength advantages in bending, it’s for two reasons:
- Square tubing does not easily bend into pretty shapes with inexpensive equipment. It’s easy to find a bender that can bend round tube into tight radius bends that is cheap.
- It looks better. This is a matter of taste and opinion but most people would probably agree that exposed round tube fits the look and contours of their rig better than square tube.
There are rock sliders that mix square and round tube, which makes a good combo strength and good looks. These will often use a slider directly under the rocker panel with an additional round tube that runs a few inches off the square tube along the length of the rocker panel.
Practically, if you plan to use your slider as a step square tube is superior - you won’t slide off like you will on round tube sometimes. You may find yourself using your slider as a step more than you think. If you ever need to hi-lift your rig from the slider, square tube is again much easier to deal with. Round tube will require a chain, strap, or other adapter to hold the jack in place. On the other hand, the angularity of a square tube can also make it easier to hang up on the trail.
Stickout
The most common and effective design for rockers is to have a main tube running directly under the rocker panel with a second tube outside it running parallel to the body. The main tube is supported by stringers to the frame and the secondary tube is welded to the main tube. The main tube provides the primary protection and sliding surface. The secondary tube provides some extended protection laterally - it keeps a little bit more distance between rocks and trees and your rigs body. If it’s correctly braced, it will stiffen the main tube, which means that additional weight resting on your rock slider is less likely to bend it.
Steps
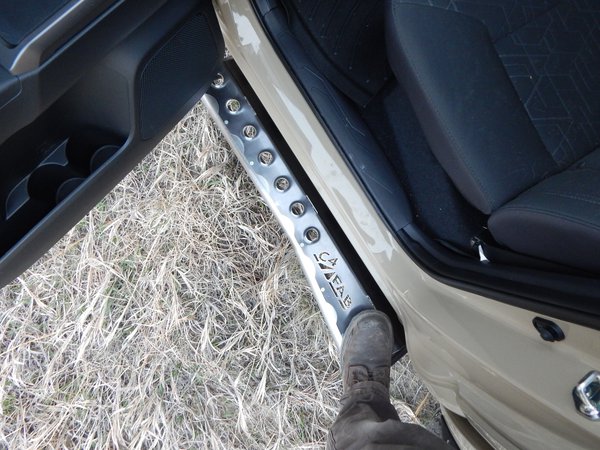
Although the slider is round tube, C4 Fab made it a serviceable step by adding removable dimpled step plates. Steps are handy for getting in and out of your rig and working on the outside or roof.
Most sliders have enough stickout to give you a convenient place to step. This sounds pretty mundane, but practically speaking, having a rocker-panel-length step is can make your day. It makes it easier to install/remove hard and soft tops, clean off your windshield, lift and secure things to your roofrack (like canoes), and get into your 4x4. If you ever get stuck in a mud pit, you’ll also be able to shimmy along the side of your rig to your bed or your winch and possible stay out of the worst of the muck. If the tube of your rock slider is wet or muddy, it will be ridiculously slippery. Some manufacturers have added diamondplate or expanded metal to give you better traction. You can also use spray-on rubber coatings or friction tape on the upper side of your slider to keep yourself from falling into the mud pit you’re stuck in.
Kickouts
Often when you’re turning, your rear wheel will track too far to the
inside for comfort. You might be making a sharp left turn and have a
tall boulder 6” from the side of your slider. As you’re making the
turn, your truck moves closer and closer to the boulder - from the shape
of the boulder, you’re a little worried about it making contact with
sheetmetal. But there’s nothing you can do! A kickout solves this
problem.
These are plain straight sliders with no kickout. Kickouts cost a little more because of the extra work to make them.
These kickouts flare the rear of your sliders a little to keep you away from rocks and trees.
A kickout is a bump at the end of the slider that helps to push your truck laterally away from whatever obstacle you’re close to. As you move forward, the slider slides along the obstacle and is pushed away from the obstacle by the kickout. By putting distance between your rig and an obstacle before the wheel, it also protects the sheetmetal over your wheelwell back to the rear fender. A kickout doesn’t have coverage over your wheelwell or rear fender, it just pushes you away from stuff that’ll dent your body.
Lifting Points
It's difficult to get a Hi-Lift jack to remain steady on a round tube bumper because the contact patch is so small. You can buy a tube adapter for your Hi-Lift or you can look for sliders that have built-in notches and holes that'll fit your jack.
Integration with Other Parts
Some manufacturers build “systems” where several protective parts
integrate cleanly with each other. Depending on your 4x4, available
rock sliders and rocker guards might mate up with front fender
protection, rear fender protection, internal roll cages, and external
roll cages.
The pieces of these systems can be bought separately, but
if you’re buying sliders (or any other part) do a little planning. If
you’re dead set on one manufacturer’s rear fenders, make sure they’ll
work with the sliders you’re buying. Right now, no manufacturer makes
sliders that purposely integrate with another manufactures parts.
Interference with Other Parts
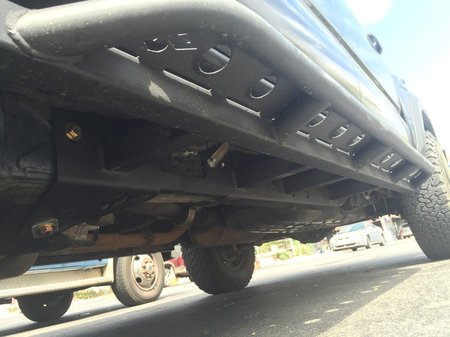
These are bolt-on no-drill sliders but they could interfere with future modifications because of the crossmember and frame attachment. You'd need to be creative if you did a skidplate, flat belly mod, or engine swap.
If you mix and match from different manufacturers, you may have to do some light fabrication to get your parts to fit together. If your rig has a mostly stock underbelly, you won’t have any
problems with this. When you buy sliders for your truck, it’s meant to
fit your truck. But once you start throwing different parts together
you’ll start losing space on your frame to mount things.
Most rock sliders have at least three attachment points to the frame. This can interfere with link mounts, spring hangers, crossmembers, and skid plates. What really makes this complicated is that sliders and bumpers are often an early stage modification for most wheelers - you’ll start off building your truck with a lift, bigger tires, sliders, and bumpers. As you keep wheeling, you think, “I wish my suspension would do X a little better,” or “I need double low in my t-case.” This might lead you to longer leaf springs or link suspensions to get more flex, or a doubler t-case setup to get the gearing. Both will take up real estate on your frame and you'll have to make mounting points work with eachother.
You can’t really do too much about this except try to plan or get slider mounting point measurements before you buy. However, if you get to the stage where you’re talking about linking your front or rear or you’re making extensive drivetrain mods you’ll probably have a welder or be thinking about getting one. If that’s the case, no problem! All that stuff under your 4x4 is made of metal - you can cut it, grind it, and weld it however you want.
Last updated: June 3, 2019

